
So you’ve probably heard of Web Scraping and what you can do with it, and you’re probably here because you want some more info on it.
Web Scraping is basically the process of extracting data from a website, that’s it.
Today we’re going to look at how you can start scraping with Puppeteer for NodeJs
Featured on
This article was featured already on multiple pages such as:
Javascript Daily’s Twitter
NodeJs Weekly – Issue #279
Thank you to everyone! 🔥
Table of contents
- What is Puppeteer?
- Setup of the project
- Installing dependencies
- Preparing the example
- Building the IMDB Scraper
- How to run it
- Via the terminal
- Via an editor ( VSCode )
- How to visually debug with Puppeteer
- Scraping dynamically rendered pages
- More debugging tips
- Slowing down everything
- Making use of an integrated debugger;
- Bonus snippets
- Taking screenshots
- Connecting to a proxy
- Navigating to new pages
- What you shouldn’t do
- Resources to Learn
- Want to learn more?
What is Puppeteer?
Puppeteer is a library created for NodeJs which basically gives you the ability to control everything on the Chrome or Chromium browser, with NodeJs.
You can do things like a normal browser would do and a normal human would, for example:
- Open up different pages ( multiple at the same time )
- Move the mouse and make use of it just like a human would
- Press the keyboard and type stuff into input boxes
- Take screenshots programmatically for different situations
- Generate PDF’s from website pages
- Automate specific actions for websites
and many many more things
Puppeteer is created by the folks from Google and also maintained by them and even though’ the project is still pretty new to the market, it has skyrocketed over all the other competitors ( NightmareJs, Casper..etc ) with over 40 000 stars on github.
Setup of the project
The first thing that you need to make sure is to have NodeJs installed in your PC or Mac.
After that you can initiate your first project on a new and empty folder with npm.
You can simply do this with the Terminal by going to the newly created folder and then running the following command:
$ npm initNow you can input all the project details and you also can just hit Enter
After the setup you should now have a package.json. file with content that looks similar to this:
{
  "name": "LearnScraping.com",
  "version": "1.0.0",
  "description": "",
  "main": "index.js",
  "scripts": {
    "test": "echo \"Error: no test specified\" && exit 1"
  },
  "author": "Grohs Fabian",
  "license": "ISC",
  "dependencies": {

  }
}
Installing dependencies
Now we can start the installation of the needed Packages
Here’s what we’re going to need
- puppeteer
So we are going to use npm install
$ npm install puppeteer --saveWhile this is installing I’m going to take the time and explain to you What is Puppeteer
Puppeteer is an API that lets you manage the Chromium Browser with code written in NodeJs.
And the cool part about this is that Web Scraping with Puppeteer is very easy and beginner friendly.
Even beginners of Javascript can start to web scrape the web with Puppeteer because of it’s simplicity and because it is straight forward.
Preparing the example
Now that we’re done with the boring stuff, let’s actually create an example just so that we can confirm that it’s working and see it in action.
Here is what we are going to build so that you get used to Puppeteer and understand how it works.
Lets create a simple web scraper for IMDB with Puppeteer
And here is what we need to do
- Initiate the Puppeteer browser and create a new page
- Go to the specified movie page, selected by a Movie Id
- Wait for the content to load
- Use evaluate to tap into the html of the current page opened with Puppeteer
- Extract the specific strings / text that you want to extract using query selectors
Seems pretty easy, right?
Building the IMDB Scraper
I’m just going to give you a quick snippet of code and then we’re going to talk about it just a bit.
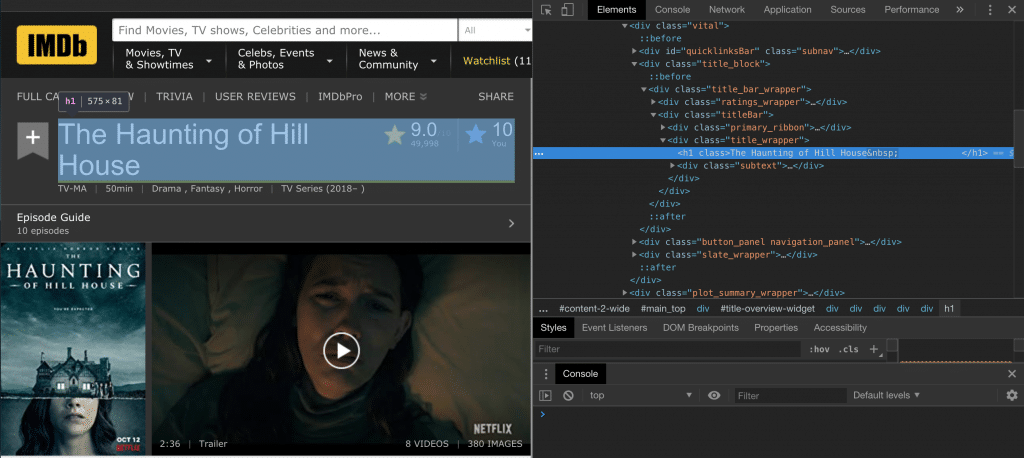
I am using the Google DevTools to check the html content and the classes so that I can generate a query selector for the Title, Rating and RatingCount
Learning the Selectors and how they work is very useful for this if you want to build custom selectors for different parts of the website that you want to scrape.
Here’s what I’ve built.
const puppeteer = require('puppeteer');
const IMDB_URL = (movie_id) => `https://www.imdb.com/title/${movie_id}/`;
const MOVIE_ID = `tt6763664`;

(async () => {
  /* Initiate the Puppeteer browser */
  const browser = await puppeteer.launch();
  const page = await browser.newPage();

  /* Go to the IMDB Movie page and wait for it to load */
  await page.goto(IMDB_URL(MOVIE_ID), { waitUntil: 'networkidle0' });

  /* Run javascript inside of the page */
  let data = await page.evaluate(() => {

    let title = document.querySelector('div[class="title_wrapper"] > h1').innerText;
    let rating = document.querySelector('span[itemprop="ratingValue"]').innerText;
    let ratingCount = document.querySelector('span[itemprop="ratingCount"]').innerText;

    /* Returning an object filled with the scraped data */
    return {
      title,
      rating,
      ratingCount
    }

  });

  /* Outputting what we scraped */
  console.log(data);

  await browser.close();
})();
You can test out exactly this code and after running it you should see something like this
{
      rating:"9.0"
      ratingCount:"48,386"
      title:"The Haunting of Hill House"
}
And of course, you can edit the code and improve it to go and scrape more details.
This was just for demonstration purposes so that you can see how powerful Web Scraping with Puppeteer is.
This code was written by me and tested in 15 minutes maximum and I’m just trying to emphasize how easy and fast you can do certain things with Puppeteer.

How to run it
There are multiple ways of running the code and I am going to show you 2 ways of doing that.
Via the terminal
You can use the terminal to run it like you’ve probably heard of and you can do that with a simple command just like this:
$ node index.jsAnd of course, you need to make sure you are in the right project directory with your terminal before actually running the code.
And instead of index.js, you can specify whatever file you want to run / execute.
Via an editor ( VSCode )
And also you can run it directly with an editor that has the option to do so. In my case, I am using both VSCode and phpStorm
You can run it very easily with VSCode by clicking the Debugger tab and then just running it, simple and nice.
And of course, you can change the actual movie that you want to scrape by easily editing this part of the code:
const MOVIE_ID = `tt6763664`;
Where you can input your actual movie id that you get from any IMDB Movie Urls that look like:
https://www.imdb.com/title/tt6763664/?ref_=nv_sr_1Where the actual movie id is this tt6763664.
How to visually debug with Puppeteer
Before I’m going to end this short tutorial, I want to give you the best snippets of code that you can use when building scrapers with Puppeteer.
Go ahead and replace the line where you initialize the browser, with this:
const browser = await puppeteer.launch({headless: false}); // default is true
What is this going to do?
This is basically going to tell the Chromium browser to NOT use the headless mode, meaning it will show up on your screen and do all the commands you tell it to so that you can see it visually.
Why is this powerful?
Because of the simple fact that you can see and pause with a debugger on any point of the execution and check out what is exactly happening with your code.
This is very powerful when building it for the first time and when checking for errors.
You should not use this mode in a production build, use it for development only.
Scraping dynamically rendered pages
This is the reason Puppeteer is so cool, it is a browser that renders each page just like you would when you access it via your browser.
Why is this helpful?
With Puppeteer you can wait for certain elements on the page to be loaded up / rendered until you start scraping.
This is a massive advantage when you are dealing with
- Websites that load just a bit of content and the rest is loaded via ajax calls
- The content is loaded separately via multiple ajax calls
- bonus: Even when you are dealing with iframes and multiple frames inside of a page
Puppeteer can handles everything that I had to deal with, regarding dynamic websites.
How?
Lets say you have a page that you are loading, and that page requests content via an ajax call.
You want to make sure that all that content is loaded fully before it starts to parse, because if the content that you are trying to parse is not there when the parsing happens, everything goes to waste.
You can easily handle this with the following statements
/* Going to a website that loads dynamic content */
await page.goto('https://booking.com');

/* Waiting for a specific part of the website to appear on screen */
await page.waitFor('#content');

/* More than that, you can wait for a predicate custom function until its true */
await page.waitFor(() => document.querySelector('#content'));

/* This above part can be helpful when dealing with more complex checks, in most cases you will not use it */
More debugging tips
I feel like when you are starting out, debugging tips are the best because you try to do certain things and you don’t know for sure if they work and you just want to have the tools to debug your work and make it happen.
Slowing down everything
When you are doing scrapers with Puppeteer, you have the option to give a delay to the browser so that it slows down every action that you program it to do.
const browser = await puppeteer.launch({
   headless: false,
   slowMo: 250 // 250ms slow down
 });
And this is basically going to slow it down by 250ms
Making use of an integrated debugger;
This is also included to any kind of work you are doing with NodeJs so this tip will either blow your mind or you’ve known it already.
Usage of a debugger;
I personally use Visual Studio Code and PhpStorm with NodeJs plugin
If you don’t have a PhpStorm or WebStorm license, no worries, you can use VSCode
How to do you make use of the debugger?
You simply need to either put a Breakpoint or write debugger; j
debugger;And when you run it, it will then stop at exactly the line where you put the breakpoint or the debugger.
And how is this powerful?
If you still don’t know what I’m talking about, now after you are stuck in the debugger, you can access any variable available in that specific time, run code and inspect whatever it is you need.
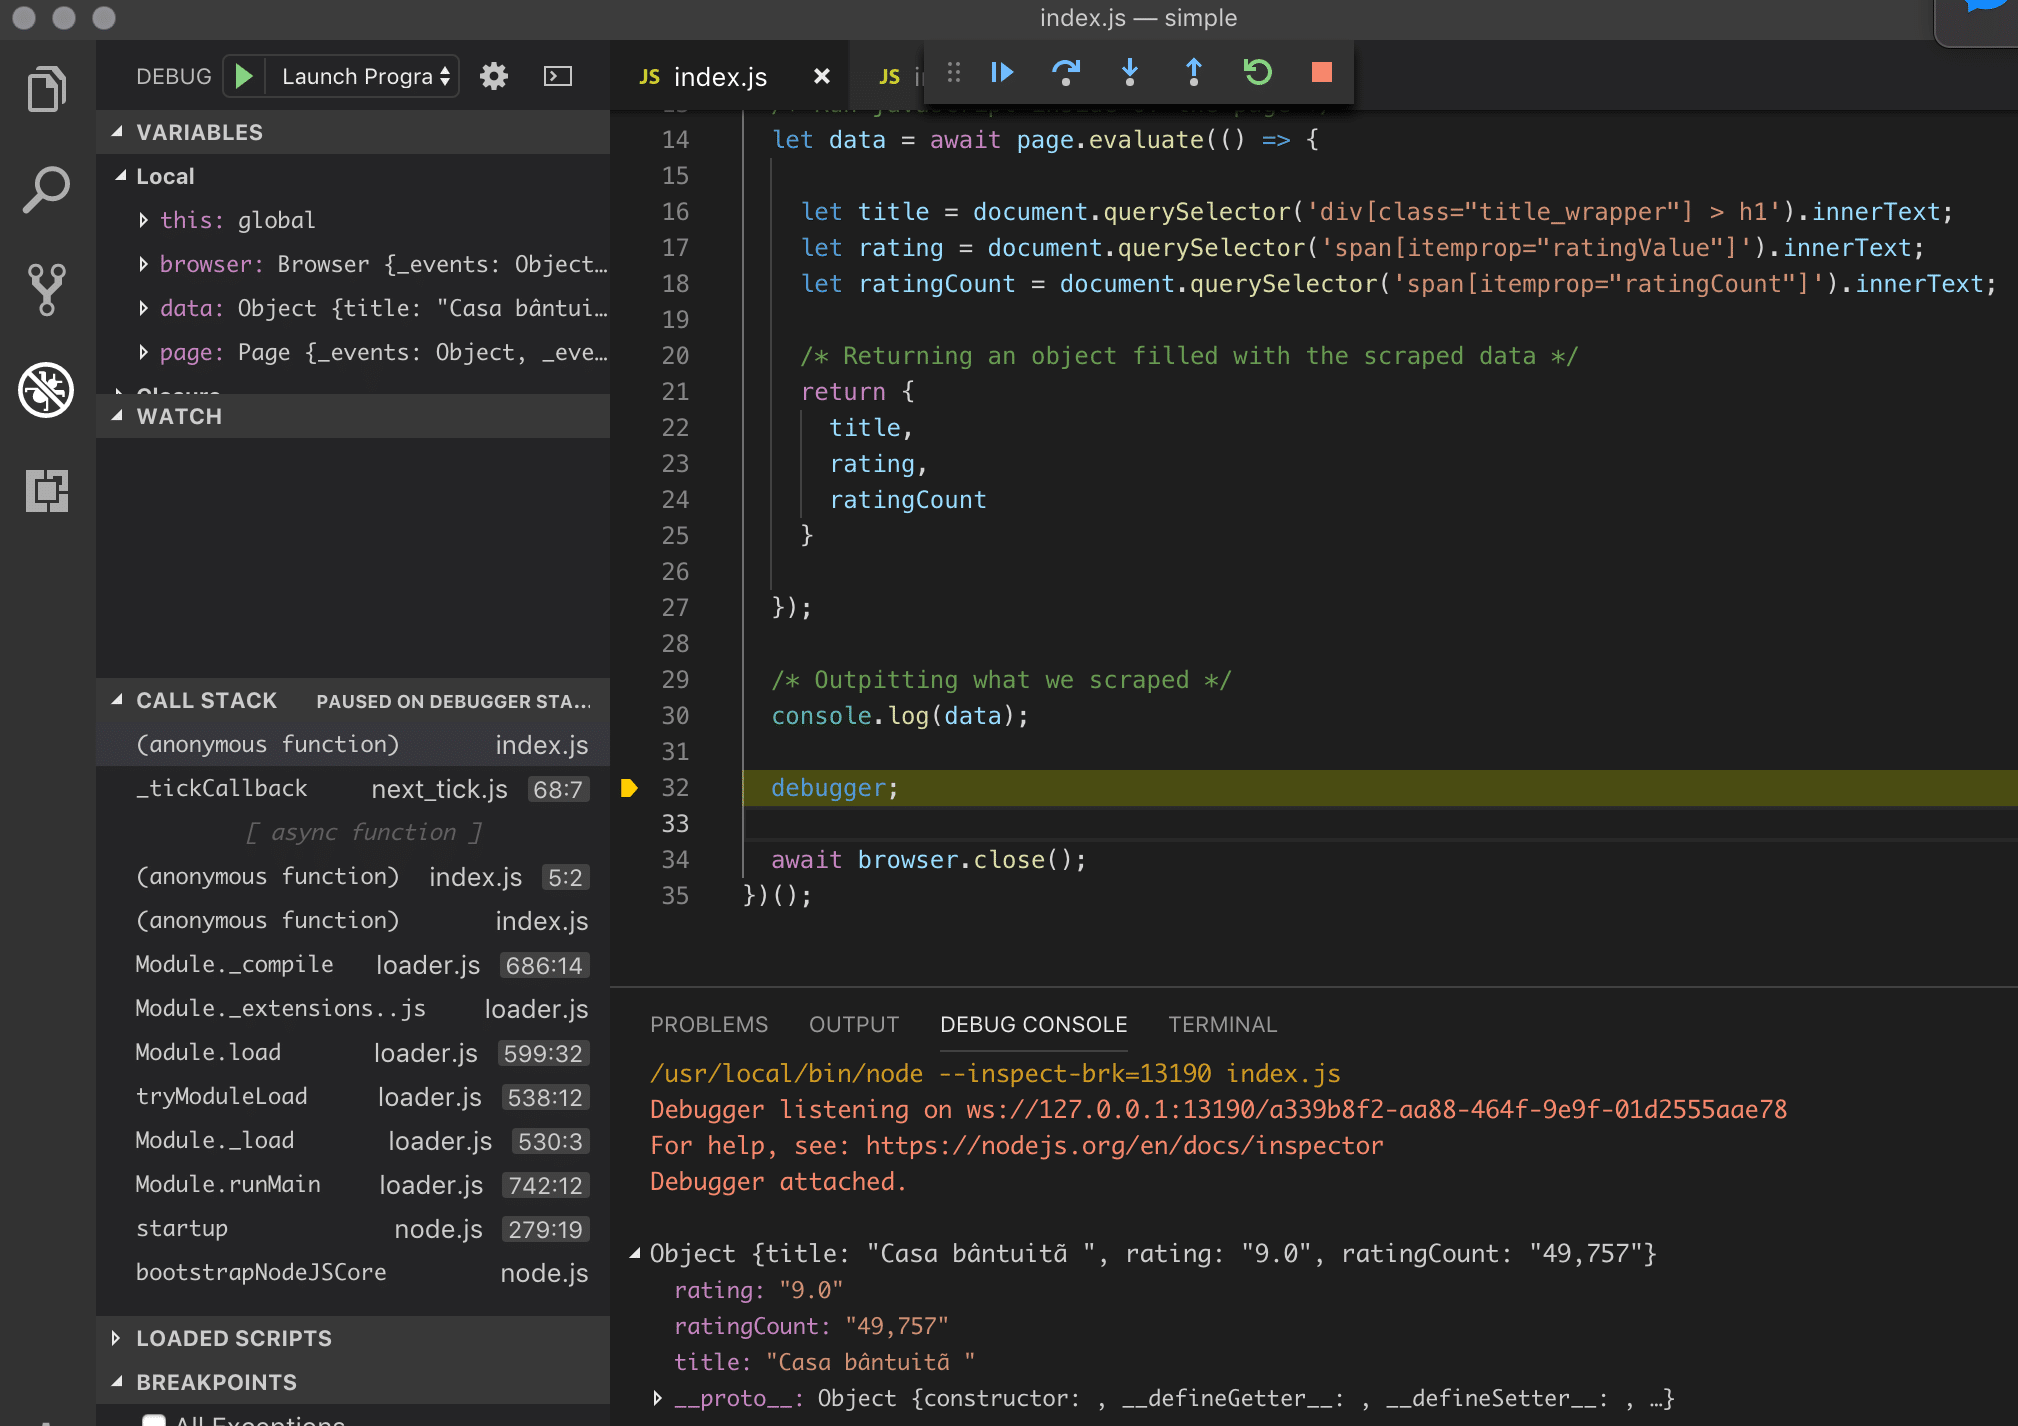
If you still don’t use the debugger, you are missing out.
Bonus snippets
Before ending the actual code related content for this web scraping tutorial, I will give you a cool snippet to play around and also to make use of when needed.
Taking screenshots
Taking a screenshot of the current page opened with Puppeteer can be very useful for testing, debugging and not only.
Why is this useful?
It’s because, besides web scraping, you can use is for rendering dynamic pages and generate screenshots / previews for any page that you want to access.
You can easily do that with the following command
await page.screenshot({ path: 'screenshot.png' });
And you can place this wherever in the code where you want to take a screenshot and save it.
You can also check out the other parameters for the screenshot function from the actual Puppeteer .screenshot() function because there are a lot of other interesting parameters that you can give and make use of.
Connecting to a proxy
Connecting to a proxy can help in many cases where you either want to avoid getting banned on your servers or you want to test a website that is not accessible to your server’s country location or many other reasons.
It can be easily done with just one line of extra arguments passing when initiating the puppeteer browser.
const browser = await puppeteer.launch({
    args: [ '--proxy-server=127.0.0.1:9876' ]
});
If you have a username and password for your proxy server, then it would look something like this:
const browser = await puppeteer.launch({
    args: [ '--proxy-server=USERNAME:PASSWORD@IP:PORT' ]
});
Where of course you would have to replace the USERNAME, PASSWORD and the IP & PORT.
Navigating to new pages
Navigating to new pages with puppeteer and nodejs can be done very easily.
At the same time it can be a bit tricky sometimes.
Here’s what I mean by that:
When you either give a await page.goto() command or use a click function to click on a link with await page.click(), a new page is going to load.
The tricky part is to make sure the new page has been loaded properly and it actually is the page you are looking for.
At first, you can do something like this:
await page.click(SELECTOR_HERE);
await page.waitForNavigation({ waitUntil: 'networkidle0' });
Which will basically click on a selector that is a link and starts the navigation to the next page.
With the waitForNavigation function you are basically waiting for the next page to load and to waitUntil there are no extra requests in the background for at least 500 ms.
This can work pretty well for most websites but there are cases, depending on the website that you are scraping, where this doesn’t work how you wanted it to because of constant requests in the background or because the website can be dynamically rendered.
In that case, the best option that I see ( and correct me or add to it in the comments ) is to wait for a specific selector that you know is going to exist in the page you want to access next.
Here is how you can do that
await page.click(SELECTOR_HERE);
await page.waitForNavigation({ waitUntil: 'networkidle0' });
await page.waitFor(SELECTOR);
Where you would need to specify a selector that is only available on the next page you are expecting to be loaded.
What you shouldn’t do
And of course, it comes to this part where I need to tell you that Scraping is a gray area and not everyone accepts it.
Since you’re basically using someone else’s bandwidth and resources ( when you go to a page and scrape it ), you should be respectful and do it in a mannered way.
Don’t overdo it, know when to stop and what is exceeding the limit.
But how can I know that?
Think of what it actually means to go and scrape 10.000 users or images from someone else’s site and how will that impact the person running the site.
Think of what you would not like to have someone do to your website and don’t do that to others too.
If it seems shady, it probably is and you should probably not do it.
PS: Make sure to read the Terms of Service / Terms of Usage of the specific websites. Some have clear specific terms that don’t allow you to scrape and automate anything. ( Instagram for example )
Resources to Learn
Here is a list of resources that will definitely help you with nodejs scraping with puppeteer and not only.
These will set the base of your scraping knowledge and improve your existing one.
- 4 Easy Steps to Web Scraping with Request
- How to build an Instagram Bot with Puppeteer
- Top 2019 NodeJs Scraping Libraries
Want to learn more?
Hopefully you will give this a try and test for yourself the code, Puppeteer is very powerful and you can do a lot with it and fast also.
Also if you want to learn more and go much more in-depth with the downloading of files, I have a great course with more hours of good content on web scraping with nodejs.